 Roofs are a critical element of some battlemap drawings, my current focus with Campaign Cartographer. While a lot easier to deal with than crenelations and arrow slits, there are some tricks of the trade so to speak that I have been trying to acquire. This posting will summarize my findings so far.
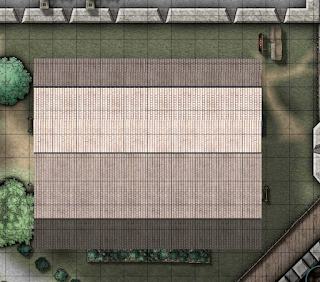
Here is a barn roof that I drew with this information.
My illustrating need is for rooftops seen from above. Most recently in the context of my Summit Hall map project.
In essence, the process is:
- Draw a set of polygons that compose the roof area. Make sure one is used for each area of the roof with a different slope.
- Fill the polygons with an apprpriate bit map or maps (look in the city designer folders for likely suspects)
- Use the Shaded Polygon (Angle by Edge) tool and select the lowest edge of each polygon. This will set some pretty good initial shading. Pitch and Angle can be set when applying this tool, or in a follow up step.
- If you want to adjust the Angle after applying the basic Shaded Polygon tool, you can use the Change Shade Angle subtool. This controls the angle of the effect. More is a following paragraph.
- The subcommand, Change Shade Pitch, can be used to adjust the pitch of the roof which dramatically alters the shadowing effects.
- Use the EDITSHADING command (keyboard only) to further fine tune each polygon if needed. This command can also be used to adjust the angle of fill which has applications in other areas.
Angle
Here is an extract providing more background on Angle setting.Shaded Polygon (Angle By Edge) automatically sets the shade angle based on the edge you clicked on, this greatly simplifies the task of getting this value correct. If you used the regular Shaded Polygon command, you would have needed to provide the angle yourself instead. The angle can later be changed by using the Change Shade Angle command, or through the EDITSHADING dialog.
The appropriate shading angle for a roof is the angle perpendicular to the angle of the lower edge, in the direction from the lower edge to the upper edge.
Pitch
The Pitch setting is the angle of the roof. Zero being totally flat, 90 being vertical, something in between usually being appropriate on the Sun side. I think negative values work on the side away from the sun. Here is an extract providing more backgroundBy default, the Shaded Polygon (Angle By Edge) uses a roof Pitch of 45 degrees. If you wish to use a different value, simply type it in on the command line before clicking on the polygon edges. You can also change the pitch of the roof later with the Change Shade Pitch command, or through the more advanced EDITSHADING command.
More Reading
One helpful background source article for my learning in this area, was a post titled: Making New House Symbols in CC3+ by Sue Daniel on the ProFantasy boards.
Another post, Command of the Week - Shaded Polygons (Week 49) is also worth a read when working with roofs.
One final thing if you managed to read this far, below is an image with a partial roof cutaway (thanks to Color Key sheet effect) of that barn.

No comments:
Post a Comment