Roll20 Max Map Size
A battle, tactical map in roll20 is limited on size. My understanding is the following are key limitations:- Grid Size: 120 x 120
- File Size: 10MB
- Formats: PNG or JPG (maybe others, this is largely a guess at this point)
Another way to look at this limitation is that 120 grids at the typical one inch scale is 1,200 real world inches, 10 feet of battle board. That's not bad at all, far larger than anything I have ever used, but it is a limitation to bear in mind.
Existing Battlemap Respositories
Here are a couple web sites that serve as repositories for pre-drawn maps:Both of them seem to just be a grocery list of maps with no useful means of searching within them, so things are very much hit and miss.
Campaign Cartographer
In the past, I have used Campaign Cartagropher 2 (CC2) for D&D maps. I recently upgraded to CC3+ and intend to try using it as a tool to build my own battlemaps. I face two major hurdles here:- The Learning cliff - This mapping software doesn't have a learning curve, it's a shear vertical ascent,
- Using CC3+ genrated maps in Roll20 - a much lower bar.
Campaign Cartographer for Roll20 BattleMaps
The first step is to use the right tool(s) withing the CC ecosystem. That seems to be Dungeon Designer 3 (DD3) regardless of the setting of the map. The base module is much more formap of a region than a tactical map.ProFantasy has a useful post on Getting your DD3 Dungeon map into a Virtual Tabletop. I'll try to extract import highlights here for later reference:
Map Size & Scale
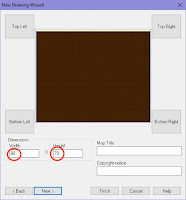
 CC3 maps are sized in "real world" terms. A square on a battle map typically represents 5 feet. That is the same as an inch on a typical battle board. Setting the size and scale is a first step on pretty much every map. The dimensions set on the New Drawing Wizard are "real world" distances not a count of squares. If you want a maximum size map, 600 x 600 would be your choice. It doesn't need to be that big, setting it to the smallest useable size will save time in creation and perhaps improve render time.
 Grid
Turn on a the map grid to help with costruction. It should be added from the new map wizard. Following are typical setting choices:- Square Grid
- Grid Spacing: 5.0 (implied feet)
- Labeling off.

Changes are made be right clicking onone of the Grid, Snap or Ortho buttons, located at the far bottom right of the CC3 window.
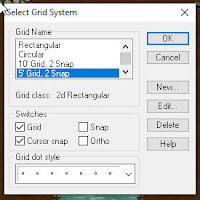
 Settings are made using the Select Grid System dialog that pops in rsponse to the right click on Grid, Snap or Ortho buttons. Setting the Grid Name to 5' Grid 2 Snap seems a good basic choice. That places snap points on the grid intersectionsand in the middle of each square and segment.
 Grid dot style controls only the appearance of the snap points within CC3. They do not appear on the generated maps. These can be made more or less visible whatever is most useful in map creation.
Snap to grid points is also controlled from this dialog. This is something likely to be turned on and off while creating maps.
Drawing the Map
This is where that learning cliff needs to be scaled. I'll address portions of this in a subsequent post. For now, "magic occurs" here.Exporting the Map
The first step is to calculate the size for your map in your VTT system. I'm planning on using Roll20, which has 70 pixels per grid. Assuming I'm using a 5' grid which would translate to a 1 inch square on tbe battle board, I'll multiple the grid size by 70 to get the pixel size. A 120 grid map would thus be 8,400 pixels across.It is also possible to export part of a map. Calcualet teh size of the grid sections to be exported and export them. Be sure to get this right or the map will not line up.
Following are more granular steps:
- Grid - Generally, the grid should be hidden (hide the GRID sheet) so that Roll20s grid is used without competition.
- Snap Grid - Turn on Cursor Snap. With 1 snap division and spacing equal to the grid used (typically 5.0). This assures that only whole squares are exported and eases alignment in the VTT.
- Exporting - To export the map to an image for use with the VTT:
- go to File -> Save As. In the dialog, pick Rectangular Section JPEG.
- Hit the options button, and enter the values we calculated earlier for width and height under Pixel Size. Ignore the resolution box, it won’t do anything for us here. You can also set the options at the bottom of the dialog to what you want, there are no “wrong” settings here.
- Once you click OK in the settings box, and Save in the Save as dialog (after specifying a name/location for your image), CC3+ will ask you (at the command line) to pick the first corner. Simply click in the top left corner of the map, just inside the border. Since cursor snap is on, your cursor should snap to the right location once you get close. CC3+ will then ask for the opposite corner. Simply move the mouse cursor down to the bottom right corner, it should snap like it did with the first corner, and when the selection rectangle looks right, just click.
Importing (Roll20)
As mentioned previously, Roll20 ises 70 pixels per grid square and has a maximum file size of 10MB. It accepts either PNG or JPG images, but JPG tend to be smaller, so that is what I am assuming will be used.To upload and use a map in Roll20:
- Click the page toolbar (Blue ‘paper sheet’ button in the top right), then
- Create a new page.
- Access the settings for the new page (gear icon), and
- Set the height and width settings matching the number of grid squares in your map.
- Click on the new blank page in the toolbar to load it.
To upload the map image:
- Click the Art Library button at the top of the right panel (chat window), and then
- Click upload,
- Select your file, and
- Wait until it is done uploading.
Then:
- In the toolbox to the left, click the marker button (second from the top) and
- select Map & Background.
- You can now just drag your map image from the library to the right over to the gridded area.
No comments:
Post a Comment